ETX TECHNICAL TIPS
Last updated: 21 February 2001
ETX TECHNICAL TIPS |
PERFORMANCE ENHANCEMENT - CREATING THE PERFECT "GO TO" ETX OR LX 90
PART 1 - Mechanical Considerations and Adjustments
This is the first in a three part series as a practical guide to understanding your ETX EC, either the 90mm or 125mm and the LX 90 telescopes. Essentially, this is a comprehensive step-by-step guide to enhancing the overall performance, and reducing the many reported problems of these telescopes. This series - IF you carefully read the instructions, correct what you can correct (or return to Meade to warranty-fix) mechanically, and IF you correctly engage in downloads of new versions of AutoStar and its supporting firmware, and IF you properly initialize and align your telescope PRIOR to its first use after doing the above - will allow you to experience what I call the "Perfect GO TO ETX."
Those of us who have had ours a while realize the many frustrations that seem to be packaged along with our beautiful blue telescopes: we have problems that have been discussed in this web site for months now, and many times it has been all-too-convenient to "blame the telescope," when indeed it turns out that many if not most of the problems are introduced by a combination of USER errors and incomplete and misleading communications from Meade (i.e., instruction manuals and support on really technical issues via Customer Service).
----------------------------------
OVERVIEW OF THE MAJOR ETX REPORTED COMPLAINTS AND PROBLEMS -
I have spent the last two months experimenting, polling other ETX users, and examining the many quirks of the ETX GO TO AutoStar system which include:
1) "Rubber Banding" - this is a common problem that seemed to arise after the introduction of firmware v 2.1ek and subsequent downloads using A2.4 AutoLoader from Meade. It is the phenomenon whereby you GO TO an object, center it carefully, and suddenly AutoStar decides it does NOT like where you put it and proceeds to re-position the object where IT placed it originally at about 3x the speed your centered with! It is very annoying and occurs PRIMARILY IN ALT-AZIMUTH alignment, as most of you are using; it does not occur in POLAR alignment.
2) "Creep-after-Beep" - this has been around a much longer time than any of care to remember, resulting in slight-to-great sudden random slews in a seemingly totally arbitrary direction. You never know WHEN this going to pop up.
3) Sidereal Blues - this results in the ETX or LX NOT tracking at full sidereal rate, whether in Alt-azimuth or Polar configuration; the slow drift out of the field of view can be part mechanical and a great part electronic and is easily remedied as discussed in BOTH Parts 1 and 2.
4) Little or no Response with Centering/Tracking Speeds Less than "5" on the Autostar - I have corresponded with users worldwide who are experienced WAY TOO LONG periods of time attempting to fine-tune a centering maneuver with the "fine" adjustment AutoStar speeds; previously, with my ETX 125, it took about 5 seconds to respond to a direction OPPOSITE that which the scope had previously moved with a setting of "5" on the AutoStar arrow keys; it took 12 seconds, sometimes longer with "4", and NEVER responded with a setting of "2" or "1". Even after the motors finally would respond, the reaction was a quick "jerk" and motion so fast that it would incorrectly place the object on the OTHER SIDE of where you wanted it! NOW, I get immediate, positive and very critical adjustment at ANY slew/track speed.
5) Residual Drift - this occurred when you would center an object at any speed and release the arrow key(s), only to have the object continue to move (you could hear the motors continue) until you had to center again.
6) Poor Tracking - in addition to the slower-than-required sidereal speed of #3, many times tracking was very erratic in both Alt-az and Polar; you should expect a little more jumpy tracking in Alt-Az because of the nature of the moves necessary to track celestial objects.
7) Very Poor GO TO Track Record - we were all reporting misses of "several degrees" to "nowhere close."
8) Home Position Alignment Difficulty - this crucial process is the guts of how your telescope will perform in GO TO and tracking capacity for the rest of the night, yet accessing alignment stars has been very difficult, resulting in equally poor GO TO performance.
9) And last, but not least in anyone's ETX opinion - considerable mechanical slop and inefficiencies. THAT ISSUE is addressed entirely in PART 1 and the considerations/checks/adjustments that are detail MUST be done prior to expecting any miracles from Parts 2 and 3. Your ETX-LX/AutoStar will NOT work properly if you DO NOT read the problems and assure that either you, your dealer, or Meade has made the proper adjustments to assure you that you are getting the scope - and the capability - you paid for.
REMEMBER THOSE NINE(9) ISSUES throughout this "enhancement guide."
My ETX 125 arrived with the finest optics I have ever seen for a scope of its size, but the overall package was miserably plagued with mechanical factor-uncorrected flaws. It did not work; it would not clamp at all in Declination (DEC) (altitude), barely in Right Ascension (RA) (azimuth), the DEC axis was loose and full of backlash (over 3 degrees when clamped) and the scope would NOT keep up with objects in either Alt-az or Polar modes. The GO TO was miserable.
As a quick hint of how I "buffed up" my ETX and AutoStar, the key is threefold and not complicated at all:
1) the mechanical aspects HAD to be fixed and tightened up first;
2) there is a VERY REAL and common problem, yet so simply you'll hit your head in disgust, AFTER YOU DOWNLOAD NEW FIRMWARE or any uploads onto your AutoStar....this is why so many people were complaining about how "....wonderful my 2.0 versions worked" and now after they have installed Version 2.1ek "....nothing is going right!" Turns out it is NOT the download...it is NOT the firmware....it is NOT the versions (unless of course you have been living in a cave and still have the AutoStar-from-Hell version A2.3 installed)...it is MERELY A THREE-STEP PROCESS that must be followed in SEQUENCE AFTER your upload. Meade doesn't tell you this, Autostar doesn't tell you this....your PC edit screen doesn't either. These are logical steps that we should have followed anyway!;
and finally, 3) NOW NEW on AutoStar v2.4 is an adjustment called "ALTITUDE PERCENT" followed by "AZIMUTH PERCENT", both found by scrolling down through the "Telescope" section under "SETUP." These adjustments were not there before...they will take up your backlash, increase your rapid response of your arrow keys and greatly improve your celestial tracking. THESE ARE FACTORY-PRESET AND SHOULD BE CHANGED, depending on YOUR telescope's idiosyncrasies. More about THAT part in Parts 2 and 3.
NOW....using the steps I am about to embark upon, here are the results of my ETX 125 from the night of February 18, 2001, the night of a series of extreme tests AFTER I followed the steps in Parts 1, 2, and 3 of this report. NOTE ALSO that I always use Polar Mode and further testing should be done in Alt Azimuth to see if the procedures rectify the problems in that mode:
1) Out of 37 initial objects selected, including a wide range and random list of stars, planets, deep sky, asteroids and comets, 31 of them were locked within the narrow (44' arc) field of view of my 26mm eyepiece on the ETX 125. NOTE: all objects I selected were AT LEAST 90 degrees from each previous object to assure and acid test over great expanses of sky. NOTE ALSO that I always use Polar Mode and further testing should be done in Alt Azimuth to see if the procedures rectify the problems in that mode.
2) Of the 31 that were in the field of view (FOV), 12 of these were absolutely DEAD CENTER.
3) Six (6) objects were slightly missed by the GO TO, all near the celestial meridian (?) slewing from points far north; even though outside the ETX's FOV, they were only slightly out of CENTER by about 25' arc, a little more than halfway from the center to the edge of the eyepiece, and always a bit north of center.
4) To check my response time with the Arrow keys on the A.S. pad and centering capability at "fine" speeds, I selected "2" which I have NEVER been able to use before, as there was not response. Immediately, both motors kicked in with no backlash and no hesitation. Once the button was released, the centered ceased precisely, no "overrun" as before. Immediate response/no hesitation/no backlash even at the slowest centering speed...something we've all been dreaming about, huh?
5) Tracking - in Polar, at the conclusion of my tests I wanted to check for fluctuations and oscillations in the sidereal tracking at high power (317x). I chose SATURN (at the meridian), another star on the meridian after that, and RIGEL, far to the south for a declination variance test. Rigel tracked dead center (with minor "settling-in" oscillations of only some 7 arc seconds max at first) for one hour and 7 minutes, AT 317 MAGNIFICATION; Saturn, higher north and the star castor tracked each for over 30 minutes DEAD CENTER, and Saturn was still going dead-to-nothing at 2:15 a.m. when clouds blocked my view for good.
6) For the acid test, I initialized a GO TO from the star MIZAR (high north, Ursa Major) to Messier 42 in Orion, far south. The scope moved very deliberately with minimal "noise, or scatter" in motion to M42, where in locked into M42's "Trapezium" stars at 73x DEAD CENTER! Again, things we've been dreaming about....
Here's how to start getting YOUR ETX or LX buffed and ready to do what the engineers at Meade knew all along it could do....if only a little quality control and communication had come in the same package as your ETX!
----------------------------------
YOUR ETX-EC / LX MECHANICAL & PHYSICAL CHECKLIST -
The following may seem redundant if you have had your telescope for a long period of time, but listen up! If YOUR scope and/or AutoStar has experienced ANY of the nine (9) problems listed above and your frustrations are mounting - as are with many of you, then it is time to PRETEND the scope is still in the box...and you are checking it out carefully for the very first time. If your scope is brand new, then READ ALL OF THIS before expecting miracles out of this little blue beauty. I guarantee that if you follow the instructions and procedures through the next many pages, the reward will be getting exactly the type of telescope you thought you were getting. SPEND YOUR TIME OBSERVING....NOT FUSSING!
Without describing the entire construction of the telescope, I will address ONLY problem areas which either I have located/experienced or those that have been reported to me and I have found a solution for. NOTE that this does not consider any aspects of the Optical Tube Assembly (OTA) other than its alignment for "Home Position" (Part 3). Follow this checklist in order for easiest identification of potential mechanical problems and their easiest remedies.
IMPORTANT NOTE: Some, or all, of the following procedures may result in questions regarding Meade warranty coverage; if you cannot do yourself, or if you want to maintain your factory warranty for its duration, consult with Meade before making ANY internal mechanical (or optical) modifications, changes or adjustments!
DECLINATION/ALTITUDE DRIVE AND CLAMPS -
Perhaps the biggest mechanical sore spot with the ETX and, yes the LX, telescopes has centered on the FORK ARMS and the DEC/Altitude drive system and the associate clamps for that axis. Here is the checklist for that axis:
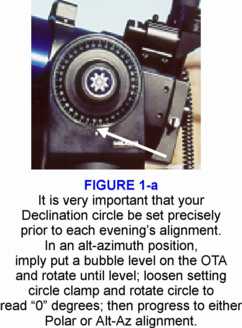
1) The Dec. setting circle (on the non-driven side fork); this must be accurately set for good "Home Position" setup and subsequent alignment. For home position in alt-azimuth mode, assure that the TELESCOPE TUBE is level (use a bubble level on the OTA, not the tripod) and when it is, SET THE CIRCLE to read "0" degrees; tightened the cinch knob as tightly as necessary to hold the circle reading in place; many times the setting circle will move from "0" when clamping so re-adjustment is necessary. For Polar position Home Position, the circle will read "90" degrees, but I STILL recommend setting the circle when the OTA is level and the DEC should read "0" for accuracy. To hold the circle in place, put two small pieces of duct tape INSIDE THE clamp knob holding the circle so that the shiny (no-sticky) side faces the back surface of the setting circle. This allows adjustment but also holds the circle firm over long periods of time.
2) Declination "slop" in the trunions - at the top of each of your fork arms are two beveled "trunions" which engage into holes atop the arms; there are no bearings in these holes and there is usually a lot of slop here, which will affect alignment and GO TO; with the DEC clamp engaged, gently rock the OTA back and forth and watch the tube in relation to the top of each fork; most of this play is a result of this looseness. This can be easily fixed with several (I use two) wraps of plain Teflon white tape tightly around each of the beveled trunions as a "bushing" to remove this slack; apply Lithium grease liberally around the tape and then "work" the trunion inside the fork arm once replaced to seat and loosen the axis for use.
Another quick-fix at the trunion level is to place a FIBER (never rubber or metal) washer just behind the declination circles that will fit exactly inside the fork hole against the end (with the threaded hold to accept the DEC clamp knobs) of each trunion. This allows the torque of tightening to be on the washer, rather than the thin and flimsy setting circle itself.
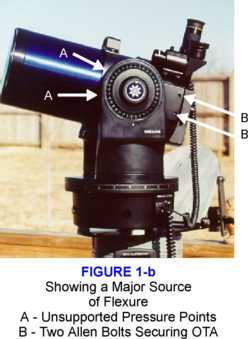
3) Declination "slop" in the OTA support arms - each side of the OTA has a support arm which connects the tube to the correct mounting fork. There is a considerable amount of play in ALL ETX scopes in these support arms; the arms fasten to the tube in the back tightly, but the front end (serves as a guide and a cushion) of the support arms are NOT attached in any way. The mass of the telescope allows the OTA to "rock" against this front surface. The OTA can be taken easily off the forks by removing two Allen screws in the REAR cell of the OTA and "carefully" pulling STRAIGHT BACK on the OTA; two small clips engage the OTA support arms to the forks, so GENTLY move the tube as it is guided out the back of the fork arm assembly. Once off, merely take some inner tube rubber repair material (from Wal Mart) and glue with rubber cement a shape to conform to the curved front edge INSIDE the OTA support arms. This acts as a tight but soft bushing to give strength and support to the OTA when back in place and reduces up to 1 degree of DEC/Altitude slop from your system. BE SURE AT THIS POINT to hold a bright light behind each of the four (4) OTA mounting holes in the OTA support arms and look for tiny hairline cracks which are very common; if the plastic OTA support(s) is cracked, contact Meade immediately for a replacement. DO NOT overtighten bolts in these holes when replacing the OTA!
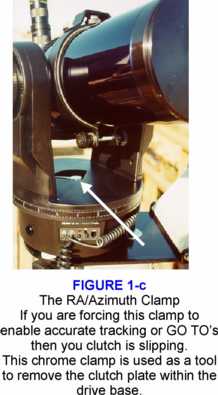
4) Declination clamps - particularly troublesome with the larger ETX 125 is the failure to firmly clamp both the declination (alt) and RA (azimuth) axes to where they 1) will hold the telescope in place without slipping; and, 2) allow the motors to properly slew the telescope without the clutch slipping.
NOTE: IF YOUR CLUTCH ON EITHER AXIS SLIPS DURING SLEW, then your GO TO will be much less than perfect; the telescope encoders THINK the scope is moving to the proper location because the motors are turning the gearworks; but if the scope is NOT moving with the gears, the telescope will be out of position by the same amount that the slipping clutch allows to "PASS BY" during the slew! The same is true for TRACKING....if either clutch (both for alt-az) or just the RA (for Polar) is slipping badly (which they DO), then your telescope will slip when the weight of the telescope assembly is heavier OPPOSITE the direction of sidereal motion! Thus, the telescope will not "keep up" with the objects as the earth turns.
THIS IS A PROBLEM THAT MUST BE FIXED prior to going any further; if your clutches are slipping, then the telescope electronic functions CANNOT WORK. It is as simple as that. If you can fix them (usually all it takes is being brave enough to "get in there" and then simply DEGREASING all the surfaces that should be dry and clean to "grab" the gears for slewing. You will find that EVERY ETX has way too much lubricants in both axes, and if the lubricant has seeped between the drive gear and the clutch plates (which it will), then your GO TO is useless.
NOTE: If you find that you are having to really bear down on either or both clamps to get the scope moving from a dead stop immediately (later electronic fixes discussed in Part 2 will help in this regard as well), then you are clamping TOO HARD and might damage the telescope mounting. It is time to CLEAN THE CLUTCHES!
Use the "ETX Tune Up" posting from Scopetronix on this web site to learn about "getting into" the DEC and RA motor assemblies. Although it may seem intimidating at first, it actually is NOT, and the benefits are tremendous, particularly the declination and right ascension adjustments/clean up & degreasing report found at Scopetronix. Follow this procedure step-by-step to allow full use and precision of your declination clutch and both DEC and RA drive systems. De-greasing is the key here; if you de-grease with mineral spirits and then carefully and sparingly use lithium white grease ONLY on the gear teeth (NOT the flat clutch/gear contact surfaces) your tracking, clamping and GO TO are immediately improved and you are ready to move on.
---------------------------------
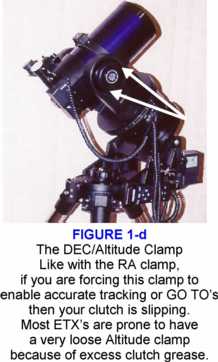
RIGHT ASCENSION/AZIMUTH CLUTCH CLAMP AND DRIVE SYSTEM -
Use BOTH the "Tune Up" site (Scopetronix) by Jordan Blessing and the additional posts www.weasner.com/etx/techtips/125rafix.html by Dr. R. B. Ingersoll, and www.weasner.com/etx/techtips/125_ra_fix.html by Doug Loukota. The first and second posts give great advise and accompanying invaluable photographs of the inside of the RA drive system. Be sure to USE CARE as both stress throughout your work and exploration here. Using both of these posts will allow you to adequately adjust the drive mechanisms to reduce play and "mechanical backlash" (NOTE - AutoStar/electronic "backlash" is also a factor and its fix is discussed in Part 2 - you must do the MECHANICAL FIXES FIRST!)
The last posted report listed above concerns perhaps the most important regarding tracking and GO TO accuracy from a mechanical standpoint. The CLUTCH of the RA drive is prone to easy slippage because of the large torque of the system which resets primarily on the pivot axle seen in the photograph on Doug's report. Here, you can see that he has removed the RA clutch plate that is still in place over the two wires that run to the DECLINATION DRIVE. The wires, both these and the ones for the battery housing connected to the rear plate that you must remove to access the RA compartment, are extremely fragile and must be handled with utmost care.
To remove the clutch plate requires that you 1) remove the chrome RA clamp from the top turntable using the very small Allen screw using caution so as not to strip the head of the screw; 2) use the clamp knob as a tool to loosen and subsequently "unscrew" the long bolt which runs down into the compartment and ultimately engages with the clutch plate; 3) once loose enough, finish detaching the clutch plate BY HAND until it is loose for resurfacing the side that presses against the drive gear.
You may leave the clutch plate exactly in the position shown to service it; although Doug recommends grinding down the dimples and covering the plate with a friction clutch, I have found that using coarse sandpaper, followed by medium grade steel wool eliminates the dimples (which you want) and prepares a uniform, yet gripping, surface. Protection of the internal electronics and small gears is essential.
Once the clutch plate is disengaged, the large metal flat drive gear can also be pulled away from the axle and cleaned thoroughly.
The important step here is cleaning, just as with the declination fix. Clean the following thoroughly with mineral spirits AFTER preparing the surface of the clutch plate: 1) the clutch plate, both surfaces; both sides (flat)of the metal drive gear; 3) the surface of the axis against which the drive gear locks (opposite the clutch plate from the gear).
Once cleaned, use a toothpick to spread some Lithium grease (white) along the TEETH ONLY of the large gear, making sure to NOT get the grease on the smooth flat surfaces; re-insert the gear onto the axle snug against the back (top from the scope) surface plate; this will engage the gear (see Doug's photo) tightly within the worm gear. Then simply put the clutch plate back, with NO lubricant at all, so that the grooved fitting engages properly for alignment and tighten finger-tight. At that point, go back to your "clamp tool" and tighten reasonably tight until it is all firmly snugged together; you finish tightening after you have the base plate back on and ready to upright the telescope. You also may adjust your clamp at this time as well.
While the back is still off, but AFTER the drive gear has been cleaned and re-installed with the clutch back in place, NOW is the time to use Jordan's tune-up check for the RA drive train. Make any adjustments if needed (mine did not) and carefully replace the cover.
You now have a VERY tight RA clamp that allows firm clamping without over-tightening and one that will allow long and accurate slews WITHOUT SLIPPING!
REMEMBER.....IF YOUR CLUTCHES ARE SLIPPING, your GO TO and AutoStar will not work up to your expectations. Indeed, if there is grease in the clutch systems, the problems will merely get worse, forcing you to clamp even harder as the grease spreads, and resulting in more and more inaccurate tracking and GO TO functions. So DO THESE precautionary steps before doing anything else!
---------------------------------
BEFORE ANY TESTING AND BEFORE ANY SUBSTANTIAL MOVEMENTS using the gears in combination with the AutoStar hand controller, you MUST TRAIN the motors in the mode (i.e., Polar or Alt-Az) that you will be using primarily; failure to train at this point will result in inaccurate GO TO's and sidereal tracking rates.
--------------------------------
Once you have aligned, cleaned, degreased and "loaded" your DEC and RA drive systems and once you have properly TRAINED with AutoStar, you can test it out indoors. Merely clamp very lightly, do a "dummy" initialization and try the arrow keys to slew; the less you have to tighten either clamp, the better job you have done. After setting and cleaning the clutches, your clamping pressure likely will be FAR LESS than previously required. Only a true GO TO will tell how well you have eliminated mechanical slop and backlash.
You can also check you RA tracking accuracy in Polar mode or the combination Alt-Az tracking accuracy in the Alt-Azimuth mode by initializing and doing a fake indoor alignment after you have properly trained the motors. Once alignment is "successful", the ETX/LX motors engage into the tracking mode and monitoring the motion of the telescope relative to its setting circles will tell you the consistency over a period of time of tracking; set 10-minute or 20-minute intervals and note the motion and then begin anew for another identical period of time and note the lapsed motion relative to the setting circle(s).
Now that we have your telescope mechanically ready for the precision it can provide, let's examine your AutoStar, your updates on firmware versions, and all subsequent initializations and preparations that are necessary to take your telescope outdoors for its "perfect night."
[end part 1]
P. Clay Sherrod
Arkansas Sky Observatory
Conway / Petit Jean Mountain
Arkansas
Return to the top of this page.
Go to Part 2.
Go back to the Tech Tips page.
Go back to the ETX Home Page.