ETX TECHNICAL TIPS
Last updated: 6 March 2001
ETX TECHNICAL TIPS |
A MODIFIED ETX 125 AZIMUTH CLAMP
(or: "How to Lock Down the Telescope Without Broken Knuckles")
I am always looking for ways to improve on the performance and convenience of my ETX 125 telescope. Those of you who have kept up with the improvements and innovations that I have posted realize that I want my telescope to "..be all it can be." Many of you have written asking "...why do you put up with a telescope that you have to work on all the time?"
Because I LIKE it. It's a good telescope optically (came that way) and it's a good scope mechanically (because I MADE it that way).
Some improvements I have done were for common sense: to clamp better, to track more efficiently, to GO TO more precisely and to not drift all over the place when I am trying to split some close double star at 400X!
Other improvements are for ME. Convenience. Comfort. You see, I am retired, and I have waged all the battles with telescopes and ancillary devices that I care to. Now, I am back to my hobby...."amateur" astronomy, and I want to ENJOY it.
----------------------------------
It occurred to me recently that everything was SO good....so "fixed," that I must begin looking for something that I had overlooked....something that "annoyed me" but I just didn't realize it. And - sure enough after losing enough sleep worrying about what that annoyance might be - it HIT me! Meade has the Azimuth clamp in the darndest spot! You can't reach it in Polar home position, and while observing, you normally bump the telescope trying to tighten it. And it's recessed into the turntable of the base where only a harp player can get her fingers!
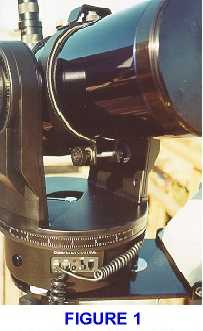
Seriously, it is very difficult to clamp and unclamp the small chrome-plated plastic clamp lever in some positions of the Meade ETX telescopes, yet clamping is crucial for example when aligning; if you use in Polar mode as I do, then access to the clamp is nearly impossible as the base of the optical tube assembly is within only one inch of the knob in Home Position! You can see in Figure 1 that the clamp is nearly inaccessible, even when the OTA is moved away from the turntable.
Hence I started exploring some options to EXTEND the lever to a more comfortable and accessible position OUTSIDE, or away from the center of the turntable. In addition, a longer clamp - like an extended lever - provides more "work", thereby giving you greater clamping efficiency with less strain on the forefinger and thumb!
A note here: the clamp is positioned where it needs to be. The clamping clutch in Azimuth (right ascension) is directly beneath this chrome clamp within the drive base; the design is effective as the direct connection from the clamp to the clutch eliminates slack and looseness.
But there are two main problems in relocating the clamp away from the center of the fork base:
1) the clamp (Figure 1) is recessed into the base so that it will not interfere with the rotation of the rear cell of the optical tube assembly (OTA); indeed, no object from the turntable can stick up higher than 1/2" without the OTA hitting it in rotation;
2) the clamp attaches to a hex-head bolt top beneath the chrome lever, and there is no off-the-shelf item that so attaches as to allow a firm grip on the clutch bolt (the hex-head) that ALSO does not stick up MORE than the 1/2" maximum clearance!
I wanted to get my clamping lever extended ALL THE WAY OUT from under the telescope OTA, just past the large R.A. setting circle on the base; but to do it took some good old Yankee ingenuity!
----------------------------------
My observatory has a fairly well-stocked machine shop, but using a bunch of metal strips, angles and fasteners resulted in too high a clamp, thereby bumping the rear OTA cell. All of my "miscellaneous" boxes were searched (these are boxes like you have where mysterious items that have no names are put, simply because you just know "...I might need that someday....for something." I found lots of junk, but nothing that would fit the bill.
Then I ran across an old kitchen cabinet drawer handle....not what I needed, but it gave me a great idea! Lowe's an Home Depot have THOUSANDS of drawer handles, just shaped like the one in Figure 3.
This is an ideal shape to start with, and the dimensions are shown (perfect for the ETX 125 base and apparently a "standard" in the kitchen cabinet industry). One short right-angle end will serve as your HANDLE for the new, longer, and improved clamp, and the other will be notched, drilled and attached to your EXISTING azimuth chrome clamp knob securely. The two will work together to give you all the room and clamping power you need!
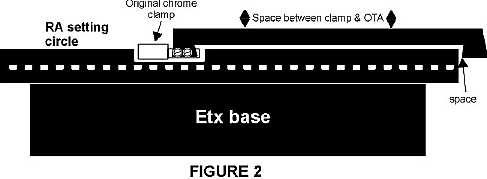
Note carefully in Figure 2 that the "handle" must be fastened in such a way (this takes LOTS of trial and error) so as to: 1) not interfere with the standard clamping motion; 2) be elevated slightly above the turntable so that it does not "rub" when clamping and unclamping; 3) extend slightly beyond (Figure 2) the RA setting circle so that it does not interfere with that operation.
All that was needed for this quick and simple conversion was (see also Figure 3):
1) a kitchen cabinet clamp (preferably metal, but hard resin plastic will do - MUST have square "ends" as shown in the drawing (Figure 2) so that you can easily attach;
2) two (2) 6-32 x 1/2" bolts with nuts and four washers to attach the modified handle to the existing clamp;
3) your chrome azimuth clamp detached ( simply back off the tiny set screw a ways and lift upward to remove, careful to not lose the little screw!
4) some "Loctite" super permanent glue (only a drop on either side as will be discussed);
5) some semi-flat black paint (and primer is recommended) to "dress up" your new clamp to match the ETX black surfaces.
If you will look at Figure 3, you will see: A.) the shortened and grooved end to slip over the chrome clamp; B). the "grabbing end" for your hand; and C). a very small (6-32) stainless bolt that takes the place of the little tiny Allen set screw standard with the Meade clamp. The ARROW in the top photo of Figure 3 is pointing to the insertion groove where the chrome clamp slides into the cabinet handle.
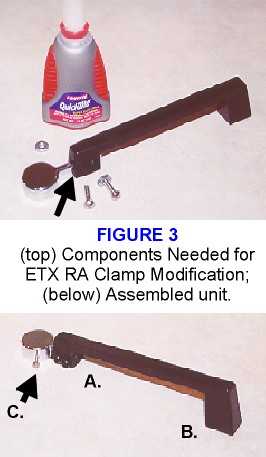
Note in Figure 3, that one "end" (the end that will attach to the standard chrome clamp lever) of the drawer handle has been shortened slightly to elevate it just enough to clear the surface of the turntable and THEN notched with an internal groove in which the flat lever of the azimuth clamp can be inserted; once these are positioned together, wrap with tape as though they were attached and place back on scope to assure:
1) the "new" clamp extends far enough to clear your setting circle so that it does not drag when you rotate it;
2) the clamp is high enough ABOVE the turntable to not drag across that either...but;
3) the clamp is not SO HIGH as to interfere with the OTA rear cell when swung downward.
---------------------------------
CONSTRUCTING THE EXTENDING CLAMP
It required about 20 minutes total time to convert my clamp to the one shown in Figures 4 & 5 (not counting the drying time for primer and then for paint). Here are the easy steps:
1) remove chrome clamp lever from telescope base, being careful not to lose screw;
2) compare the handle with the flat clamp lever and determine how deep and how far to cut a groove in the cabinet handle; this is best done at the telescope, making sure your have adequate distance and clearance as described previously;
3) once an ideal cut is determined, cut your notch with a good hack saw, using ONLY reverse strokes to prevent fatigue of the handle material; make to cuts at the width of the required groove and then remove the center "plug" with needle-nose pliers;
4) slide handle over chrome flat lever and determine AT THE SCOPE where bolts must go to provide adequate lift for clearance, yet not so high as to hit OTA base;
5) drill #6 holes in HANDLE FIRST, through both sides;
6) again, align chrome flat handle within the cut groove and secure with tape or vice grip pliers; carefully mark with a punch through the handle holes onto the flat chrome lever drill positions;
7) carefully drill the two #6 holes through the CLAMP lever to align with holes in new handle;
8) assemble cabinet handle onto lever and insert bolts to assure position, then take apart again;
9) now prime and paint CABINET HANDLE ONLY; let dry for two-three hours;
10) reassemble components after dry FINGER TIGHT and stop; apply two drops of LOCTITE cement on both sides of assembly, between tight fitting of handle to chrome flat lever;
11) immediately cinch down bolts, nuts and washers tightly but DO NOT OVERTIGHTEN.
If you do not glue, the unit will not hold; the handle will bend or break away from the chrome clamping lever from the torque of tightening. The glue acts as a bond to laminate the two sides of the handle and the thick clamp lever into ONE thick package, thereby providing adequate strength.
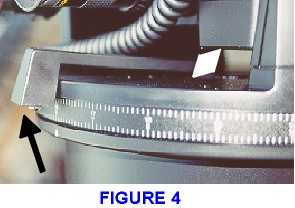
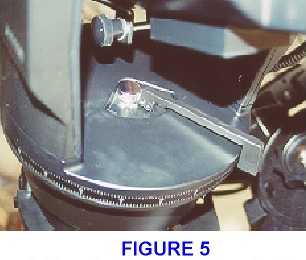
Figures 5 and 6 show the new clamp installed; not only does it provide very easy access to a previously-unreachable RA clamp for my Polar home position, but it also make clamping a lot quicker and with less force. Considering that it used to be a kitchen cabinet drawer pull, it really looks like a pretty nice improvement to an already pretty nice-looking telescope!
P. Clay Sherrod
Arkansas Sky Observatory
Conway / Petit Jean Mountain
Arkansas
Return to the top of this page.
Go back to the Tech Tips page.
Go back to the ETX Home Page.