ASTROPHOTOGRAPHY ACCESSORIES
Last updated: 8 May 2004
| Accessory | Manufacturer | Model | Price |
| Digital Camera Hood, "SLR" Attachment | Hoodman | H-DCR | $20 |
 I came across this item while reading a book on digital cameras. I quickly realized that this was something that could be very useful when doing digital camera astrophotography, day or night, as well as having practical use for normal photography. I immediately went to the Hoodman location (fortunately on my way home from work!) and picked up the model H-DCR. As you can see from the photo on the right, this is a hood which shields the camera's LCD from stray light (great for daytime use) but this particular model also has a 2X magnification. This effectively turns the digital camera into a "SLR" type of camera by letting you hold the camera to your eye while easily viewing the LCD in any light. It avoids holding the camera at arm's length to see the LCD and avoids parallax if using the viewfinder. For astrophotography, I found it ideal for focusing the image on the LCD. The magnification really helps; yes you do see larger pixels on the LCD but the image is still very clear. I used it to take the Venus photo on the My Astrophotography Gallery - The Planets page. I highly recommend this item. Visit the Hoodman Digital Camera Hoods web page to see all the models available. Note that some are just hoods to shield the LCD and some are also magnifiers.
|
|||
| Digi-T System Camera Adapter | Scopetronix | DT1 | $60-$100 depending upon the Camera Kit |
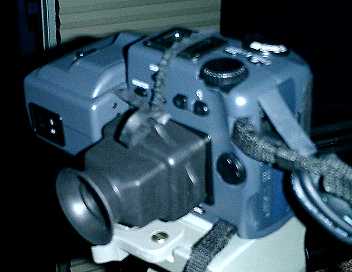
I recently purchased a Nikon Coolpix 995 digital camera. Unlike my Ricoh RDC-4200 digital camera, the CP995 allows the use of 28mm filters. This meant that the Scopetronix Digi-T System could be used to "hard mount" the camera to an eyepiece. Unlike the Scopetronix 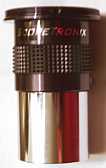 Universal (bracket type) Digital Camera Adapter, the Digi-T makes the camera a part of the telescope and gets the camera lens as close as possible to the eyepiece to reduce vignetting.
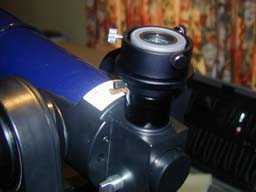
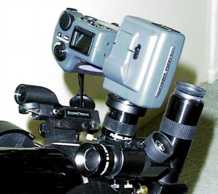 The Digi-T comes with one page instruction sheet, the Digi-T Ring, an allen wrench for the setscrews on the side of the Digi-T Ring, and a Step Ring suitable for your specific camera. To use the Digi-T, you remove the rubber eyeguard from an eyepiece and slide the Digi-T Ring onto the end where the
eyeguard was. You then tighten the setscrews into the groove and now you have one side of the hard mount (see photo on the right). The Digi-T is designed to be used ONLY with eyepieces having a recessed groove where the rubber eyeguard is attached. This provides increased security in preventing the camera from coming off the eyepiece. Next, you screw the Step Ring onto the camera lens where a filter or accessory lens threads on. Now you have the other side of the hard mount. The last step is to mate the two by screwing the eyepiece with its ring into the threads on the Step Ring.
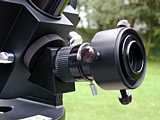
In use, I found it easy to focus the eyepiece to my eye, remove it from the telescope, attach it to the camera's Step Ring, and reinsert it into the telescope (as seen in the photo on the left).
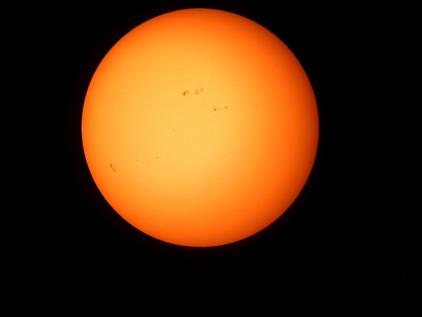
This photo (below) of the Sun (made with the ETX-90RA, Scopetronix 25mm eyepiece, and a Thousand Oaks Solar Filter) was among the first I tried.
The Digi-T comes with one page instruction sheet, the Digi-T Ring, an allen wrench for the setscrews on the side of the Digi-T Ring, and a Step Ring suitable for your specific camera. To use the Digi-T, you remove the rubber eyeguard from an eyepiece and slide the Digi-T Ring onto the end where the
eyeguard was. You then tighten the setscrews into the groove and now you have one side of the hard mount (see photo on the right). The Digi-T is designed to be used ONLY with eyepieces having a recessed groove where the rubber eyeguard is attached. This provides increased security in preventing the camera from coming off the eyepiece. Next, you screw the Step Ring onto the camera lens where a filter or accessory lens threads on. Now you have the other side of the hard mount. The last step is to mate the two by screwing the eyepiece with its ring into the threads on the Step Ring.
In use, I found it easy to focus the eyepiece to my eye, remove it from the telescope, attach it to the camera's Step Ring, and reinsert it into the telescope (as seen in the photo on the left).
This photo (below) of the Sun (made with the ETX-90RA, Scopetronix 25mm eyepiece, and a Thousand Oaks Solar Filter) was among the first I tried.
|
|||
| Vixen Camera Adapter | Vixen | DG-LV | $60 |
 Greg Christie () notes: "I have a Vixen R150S which I bought the DG-LV adapter for to connect my
Olympus C2000Z. The adapter is similar to a couple of others and connects
to the eyepiece and not the telescope. This adapter is designed to adapt
a Vixen LV 1.25" eyepiece. As I use this eyepiece frequently in my
ETX70AT the camera's first telescope light was on the ETX.
Pricing is debatable. I paid $AUS170 in Australia, which, from previous
experience would come out at about $US60 approximately. The adapter
supports various thread diameters via a separate ring."
Greg Christie () notes: "I have a Vixen R150S which I bought the DG-LV adapter for to connect my
Olympus C2000Z. The adapter is similar to a couple of others and connects
to the eyepiece and not the telescope. This adapter is designed to adapt
a Vixen LV 1.25" eyepiece. As I use this eyepiece frequently in my
ETX70AT the camera's first telescope light was on the ETX.
Pricing is debatable. I paid $AUS170 in Australia, which, from previous
experience would come out at about $US60 approximately. The adapter
supports various thread diameters via a separate ring."
|
|||
| Digital Camera adapters | Photosolve | N/A | $15 |
|
Rob Moore (rmoore5@ix.netcom.com) reports: "I finally found the adapters for my Olympus C2000Z at www.photosolve.com. They are basically a 41 to 37mm lens adapter for
the Olympus 2000, 2020, and 3030 and a 37mm to t-thread adapter to screw
into the lens adapter. This combination will allow the camera to be
mounted to the Meade Basic Camera Adapter or the Meade T-adapter and the
Scopetronix arrangement won't be required. The site's a little hard to
navigate around but if you click on the order online button, you should
be able to find them. I've ordered the two adapters and hopefully will
be getting some astrophotos pretty soon!"
Mike here: There are adapters for other digital cameras as well at this site. |
|||
| LE-Adapter | Stillwater Trading Co. | N/A | $156 |
 Michel (Mons- Belgium; jdcjdr@skynet.be) reports: "Here is a camera adapter.
I have buyed it from Usa. It is sold by www.stillwtr.com/leadapter/
this is very easy to use on Etx 125"
Michel (Mons- Belgium; jdcjdr@skynet.be) reports: "Here is a camera adapter.
I have buyed it from Usa. It is sold by www.stillwtr.com/leadapter/
this is very easy to use on Etx 125"
Mike here: See the web site for more info, including the 35mm, digital, videocameras with which it works. |
|||
| Digital Camera Adapter | Scopetronix | N/A | $50 |
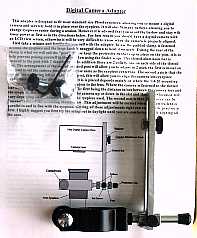 Scopetronix sent me one of their new Digital Camera Adapters for evaluation. This product allows various types of cameras to be mounted on any telescope, including the ETX, for afocal photography, that is, photography by the camera lens "seeing" the image in an eyepiece. As described and shown on the Astrophotography pages, a digital camera can be used very successfully to take photos of the Sun (with proper protection), the Moon, and the bright planets. But unless you have a mounting for it you will have to handhold the camera (as I previously did for all my digital camera photos), with all the problems that brings (notably blurred images). With the Scopetronix Digital Camera Adapter, better photos can be taken. As shown in the photo on the right, the Digital Camera Adapter (DCA, for short) comes with a two-page set of instructions, the adapter itself, some extra thumbscrews (in case you lose one), and an allen wrench. The product is nicely designed and well made (as those of us with experience with Scopetronix products have come to expect). There is even a protective cap over one end of a protruding component to protect your eye when near the telescope's finderscope. Mounting the DCA on your telescope and your camera on the DCA are simple but, as noted in the instructions, it will take time to determine the proper positioning given the flexibility (really "adjustability") of the DCA. It is this flexibility that allows the DCA to work with various camera styles, although it does not work with all cameras, as I will discuss shortly.
I first mounted the DCA with its padded eyepiece clamp around the rubber grip on the Meade 26mm eyepiece (standard with the ETX-90EC). This allowed the DCA to move somewhat so I remounted it with the clamp around the metal portion of the eyepiece tube. This helped but did not eliminate the movement (probably due to the padding on the clamp). In practice this minimal movement will not cause any great problems; it is just something to note in that it may be necessary to slightly reposition the DCA to correct the camera/eyepiece alignment as you move the telescope 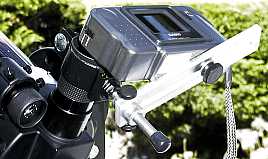 around. The camera is attached by inserting a thumbscrew into the tripod mounting hole on the camera base. One minor design comment: it would have been nice if Scopetronix had included a thin rubber pad on the slotted bar (where you mount the camera); this would have avoided slippage when a camera is mounted. But once you have the camera mounted and aligned you have what is shown in the photo on the left (the camera is a Casio QV10 digital camera).
While Scopetronix does not tout the DCA as a general camera adapter, I thought that if the DCA could mount both digital and film cameras, users would not need to purchase a separate adapter for their 35mm film camera. Unfortunately, as can be seen in the photo on the right, it was not possible to align the centerlines of the eyepiece and the Pentax Spotmatic 35mm film camera lens. This might work for some cameras and if it works for yours, you could save some money by not having to purchase two camera adapters for afocal photography.  I then mounted my Ricoh RDC-4200 digital camera and had a problem aligning the lens/eyepiece centerlines. This camera has a lens that must be rotated horizontally into position. This puts the camera lens centerline about in the middle (vertically) of the camera body, significantly shortening the distance from the camera base. I elected to remove one the "collars" on the horizontal post to allow the slotted bar, and therefore the camera base, to move closer to the eyepiece. This helped but it still did not allow a perfect alignment. However, I was able to take some photos with this camera (with the 26mm eyepiece) so it was sufficiently aligned. These photos are shown on the Astrophotography - Sun page. To take them I turned on the camera's self-timer (to allow vibrations to dampen out). I then set the telephoto lens to its maximum (to avoid serious vignetting). When the shutter was pressed the timer began its countdown, the vibrations went away, and then after a few seconds the picture was taken. All the time I could monitor what was happening on the camera's LCD.
 You can also use the DCA for terrestrial photography. Although I don't have any interesting land objects near my home, I did take this view of a tree (just to prove it could be done) using the 26mm eyepiece. In this fullframe photo you can see the vignetting that appears when using the Ricoh camera (due to the distance of the camera lens from the eyepiece). Unless you can get your camera lens (not just the camera body) close to the eyepiece, you may experience similar vignetting.
The Scopetronix Digital Camera Adapter can be used with most any eyepiece. I mounted it to the Meade 9.7mm eyepiece and could easily see Venus on the Ricoh LCD. (Unfortunately, the Ricoh could not be adjusted sufficiently to prevent Venus from overexposing.) With the large-barrel 40mm eyepiece from Scopetronix it was necessary to spread the DCA eyepiece clamp wider than normal but it did fit. The DCA can be mounted wherever an eyepiece is mounted. Here it is mounted on the Shutan Wide Field Adapter with the Scopetronix 40mm eyepiece. (This is one overloaded ETX! Or should I say "Mighty ETX"!!!) 
If you have attempted unsuccessfully (like me) to make a digital camera mounting adapter, check out the Scopetronix Digital Camera Adapter. Check with Scopetronix to verify that your camera can be optically aligned. If the distance from your camera lens centerline to the base of the camera is between 1.5 and 3.25 inches, then it should mount and align OK. If it does, you will likely get much better results than when handholding your camera over the eyepiece. And even though it is limited in capabilities, digital camera photography is so much simpler than traditional film photography. If you have a digital camera, you'll eventually want to take photos through your telescope. Once you get frustrated with handholding the camera, you will either make your own or purchase the Scopetronix adapter. Jim Barlament (kc9id@netnet.net) adds: "I just received my Scopetronix Digital Camera adapter and am very pleased with the design. I did find that the mounting post was about 3/4 of a inch to short to mount the Sony Mavica without removing the protective cover on the end of the post and one of the retaining collars. A quick phone call to Scopetronix solved the problem and they thanked me for letting them know so adjustments could be made to the design to accommodate the Sony Mavica. A replacement with a longer post is on the way. If only every manufacturer could respond to customer input this quickly! I was impressed and will send more business their way. As a new ETX-90EC owner I am finding the support and wealth of information on this site makes my entry into the astronomy hobby much easier. Thanks Mike and the people at Scopetronix!" Scopetronix Responds... We have redesigned the Digital Camera Adapter to work with cameras having a very long Base-to-Lens distance (such as the Mavica) by extending the length of the post. We also now offer an optional spacer to allow the use of cameras with a very short Base-to-Lens distance (like some Nikon Coolpix models). With these two changes the camera adapter will work with virtually any digital camera available so long as it has an active view screen. Jim (jshelto1@rochester.rr.com) adds: "I saw the scopetronix adapter and thought I'd let you know they make a spacer for it too for those cameras that don't meet the measurements." Mike here: My original comments above pertain to the original model Digital Camera Adapter. After a lot of usage it was no longer possible to secure the slotted bar to the post. It would  slip due to the camera weight. When I pointed this out to Scopetronix, they sent me one of the current models. This model has several improvements over the original one I had been using. The slotted bar locking knobs are larger, allowing a better grip by your fingers to tighten the screws. It also includes a larger knob for the camera attachment bolt as well as a rubber washer to protect the camera bottom and provide increased friction against slippage. A rather thorough instruction sheet is included and it even provided a tip which had never dawned on me (I'll come to that shortly). For my Ricoh RDC-4200 it was still necessary to remove both collars to get the camera lens centerline aligned with the eyepiece centerline. I then positioned both collars on the post on one side of the slotted bar to provide extra security. The only difficulty I had was the protective cap ("rubber eye guard"); it is now glued on and took a lot of pulling to get off so that the collars could be removed. But once this modification was made, the camera lens centerline is better aligned than with the same mod on the original DCA. However, Scopetronix has addressed this optical centerline alignment problem
 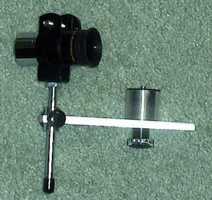 by offering two different sized "spacers", one small which moves the camera 3/4 inch from the slotted bar and a large one that moves the camera 1-1/8 inch. This optional item sells for $4.95. Each one includes a longer threaded screw to hold the camera, a fixed rubber washer on the solid aluminum cylindrical adapter, and a metal washer. I elected to use the large adapter with my camera but found that even without the metal washer, the threaded screw only protruded 1/8 inch, which seemed barely sufficient to securely hold the camera (making me slightly nervous). Scopetronix assures me that the rubber washer compresses and more thread is inside the hole holding the camera securely. I was pleased that the rubber washer was fixed as the last time night I used the DCA in its standard configuration (minus the spacer) I lost its rubber washer in the dark! Still haven't found it. Both spacers allowed my camera lens to be completely centered on the eyepiece optical axis, which is what they are designed to accomplish. Although it is slightly heavier and less likely to be required (according to Scopetronix), I went with the larger spacer so as to move the collar off the threads at the end of the shaft. With the smaller shaft and my Ricoh, the inside collar was partially on the threads, which I thought might not be good. With the spacer it was easier to align the centerlines than without one (for my camera). Now that I have the centerlines aligned, I discovered something I'd never noticed before when the centerlines were slightly misaligned; the image of the secondary mirror was visible in the middle! So, maybe a slight (very slight) misalignment is better. I'll have to work on that.
Now to the tip. With the Ricoh digital camera, I always found it necessary to zoom the camera lens to its full 3X position to avoid severe vignetting when shooting through an eyepiece. The new DCA instructions mention zooming the camera lens but also recommend using the camera's "macro" or "close-up" mode if it has one. The Ricoh does have a macro mode so I tried it. And even the slight vignetting that I would still have when fully zoomed in normal mode went mostly away when using macro mode. At times, the Ricoh would not auto focus in the macro mode so I occasionally had to manually focus the image on the LCD. I tried some tests to see what difference there was between full zoom and macro mode; there was none in the magnification of the image but there was a decrease in vignetting in the macro mode. I also found the macro mode resulted in better exposures. So, thanks for Scopetronix for the tip and for continually improving their products. The current model DCA continues to be a worthwhile addition for anyone wanting to use a digital camera with their telescope. |
|||
| T-Adapter | Meade | 64 | $33 |
The T-Adapter is used for prime focus photography. It is mounted at the rear of the 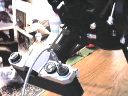 ETX by removing a screw-on cover from the ETX and attaching the adapter. A separately purchased T-Mount ring is required for the specific camera model you wish to attach. I bought one ($13) from a local camera store. When the mount and camera are attached, the extra weight pulls the back of the ETX down, even with the Declination adjustment locked. This means that you will have to reposition the ETX for any object you were viewing with an eyepiece. The T-Adapter is actually two adapters in one, with one short piece screwed into another short piece. I have not yet tried the shorter version; the manual indicates that less than full-frame photographs will result from using the shorter mount. I am still experimenting with prime focus astrophotography although you can view some initial results in the Gallery. ETX by removing a screw-on cover from the ETX and attaching the adapter. A separately purchased T-Mount ring is required for the specific camera model you wish to attach. I bought one ($13) from a local camera store. When the mount and camera are attached, the extra weight pulls the back of the ETX down, even with the Declination adjustment locked. This means that you will have to reposition the ETX for any object you were viewing with an eyepiece. The T-Adapter is actually two adapters in one, with one short piece screwed into another short piece. I have not yet tried the shorter version; the manual indicates that less than full-frame photographs will result from using the shorter mount. I am still experimenting with prime focus astrophotography although you can view some initial results in the Gallery. |
|||
| Basic Camera Adapter | Meade | 07356 | $33 |
I recently called one of the popular telescope mail order dealers and asked about an eyepiece projection adapter for the ETX.  I was told that due to the small size of the ETX an adapter would not be good for the ETX due to possible counter-balance problems. The more I thought about it while looking at the Meade catalog photograph of the Basic Camera Adapter the more I began to wonder whether there would be any problem. I checked with my local Meade dealer (The Nature Company); he said he didn't know but would contact Meade. Meade told him there was no problem using the Basic Camera Adapter with the ETX but that the Variable-Projection Camera Adapter had focusing problems with the ETX. I ordered the Basic Camera Adapter and can now provide a report on its usage. I was told that due to the small size of the ETX an adapter would not be good for the ETX due to possible counter-balance problems. The more I thought about it while looking at the Meade catalog photograph of the Basic Camera Adapter the more I began to wonder whether there would be any problem. I checked with my local Meade dealer (The Nature Company); he said he didn't know but would contact Meade. Meade told him there was no problem using the Basic Camera Adapter with the ETX but that the Variable-Projection Camera Adapter had focusing problems with the ETX. I ordered the Basic Camera Adapter and can now provide a report on its usage. 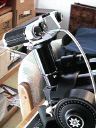 The adapter has a set-screw for holding an eyepiece inside the larger diameter tube. The same T-Mount ring used with the T-Adapter will also fit the Basic Camera Adapter. The adapter has to be removed from the camera to insert and remove eyepieces. The standard 26mm eyepiece that comes with the ETX is 70mm (2-3/4") in length and is 6mm (1/4") too long for normal use in the Adapter. It sticks out past the rim of the Adapter and prevents the Pentax's mirror from flipping up. Not being able to use the 26mm eyepiece is not the drawback that it seems since you get nearly the same magnification at the Prime Focus position. However, it is possible to manually hold the camera reasonably steady against the Basic Camera Adapter for short duration (<1 second) exposures. Shorter eyepieces such as the 9.7mm fit OK but the Barlow Lens can not be used due to its length. The 9.7mm eyepiece is a short eyepiece and so fits way down inside the Adapter tube, putting your eye at quite a distance from the eyepiece. The poor eye relief of this eyepiece means that finding objects with the eyepiece inserted into the Camera Adapter but before attaching the camera is a challenge. And once the camera is inserted, locating faint objects in the camera's viewfinder will be almost impossible. Due to these considerations, accurate Finderscope alignment is a must. However, once you have found and focused the image, you can begin to take photographs. I have now started taking photos with the Pentax and have them on display in the Gallery as they are processed into Kodak PhotoCD images. The adapter has a set-screw for holding an eyepiece inside the larger diameter tube. The same T-Mount ring used with the T-Adapter will also fit the Basic Camera Adapter. The adapter has to be removed from the camera to insert and remove eyepieces. The standard 26mm eyepiece that comes with the ETX is 70mm (2-3/4") in length and is 6mm (1/4") too long for normal use in the Adapter. It sticks out past the rim of the Adapter and prevents the Pentax's mirror from flipping up. Not being able to use the 26mm eyepiece is not the drawback that it seems since you get nearly the same magnification at the Prime Focus position. However, it is possible to manually hold the camera reasonably steady against the Basic Camera Adapter for short duration (<1 second) exposures. Shorter eyepieces such as the 9.7mm fit OK but the Barlow Lens can not be used due to its length. The 9.7mm eyepiece is a short eyepiece and so fits way down inside the Adapter tube, putting your eye at quite a distance from the eyepiece. The poor eye relief of this eyepiece means that finding objects with the eyepiece inserted into the Camera Adapter but before attaching the camera is a challenge. And once the camera is inserted, locating faint objects in the camera's viewfinder will be almost impossible. Due to these considerations, accurate Finderscope alignment is a must. However, once you have found and focused the image, you can begin to take photographs. I have now started taking photos with the Pentax and have them on display in the Gallery as they are processed into Kodak PhotoCD images. 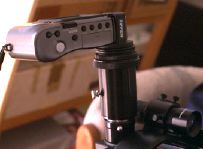 One initial observation: when doing exposures at high magnifications, the mirror flip/shutter action creates enough vibration to blur images, even at 1/60 sec at 128x. The length of the exposure will affect the amount of blurring as does the magnification. One possible solution for exposures >1/2 second is to open the shutter with the ETX corrector lens covered. Once the vibrations have gone away then remove the cover for the exposure. I will be trying to refine this technique; my initial photos were done with ISO 400 film resulting in long exposures (even though less than 1 second) so I tried a faster film speed for the next round. I have now selected Kodak Royal Gold 1000 (ISO 1000) color print film with PhotoCD processing as my standard. More photos have been added to the Gallery. In addition, I now have an attachment to mount the Casio digital camera to the Meade Basic Camera Adapter. Details are in the Gallery. One initial observation: when doing exposures at high magnifications, the mirror flip/shutter action creates enough vibration to blur images, even at 1/60 sec at 128x. The length of the exposure will affect the amount of blurring as does the magnification. One possible solution for exposures >1/2 second is to open the shutter with the ETX corrector lens covered. Once the vibrations have gone away then remove the cover for the exposure. I will be trying to refine this technique; my initial photos were done with ISO 400 film resulting in long exposures (even though less than 1 second) so I tried a faster film speed for the next round. I have now selected Kodak Royal Gold 1000 (ISO 1000) color print film with PhotoCD processing as my standard. More photos have been added to the Gallery. In addition, I now have an attachment to mount the Casio digital camera to the Meade Basic Camera Adapter. Details are in the Gallery. |
|||
Go back to the Astrophotography Accessories Review page.
Go back to the ETX Home Page.